If you are looking to save a few thousand dollars on professional installation of a new mini split, its possible to do a DIY mini split install.
Here, I will show you how to install a mini split DIY, step by step.
Across the US, installing a Mini Split Heat Pump costs an average of $3900 for a single zone 9000 BTUs unit. Of that, your unit and material costs are about $1,600-$1,900 (price for the mini-split unit itself), and the rest $2,000-$2,300 goes toward installation!
By contrast, typical installation costs for a mini split AC outside North America cost thousands of dollars less. For example, mini split installation prices in Israel start from a mere $70 (seventy dollars) and go up to about $500.
The high-end price is if your installer needs to put in new copper line-set, wall mount, electrical wire, and a drain tube! Add $35-$50 per 1 meter (3.3 feet) of extra line-set/electric wire IF your outdoor unit is located far from the indoor unit, which is rare in apartment buildings. That’s it!
So compare a typical $300 cost to install a ductless air conditioner in Europe/Asia/Middle East (and elsewhere) vs about $2,000 in the US. Such a high cost of installation makes SO MANY homeowners in the US seriously consider a DIY install.
Doing the install without hiring an HVAC pro is especially appealing to households that need to install mini-splits in 2-3 zones (rooms) or more. Having multiple zones effectively makes your mini split cost $4,000-$6,000+ just for installation, which a 2-man crew does in 1 day!
Mini Split Installation Is DIY friendly!
The good part for DIY installers of any Ductless Heat Pump / AC is that they all come with R410A Refrigerant PRE-LOADED in the unit! This means you do not need a separate can of R410A (which you cannot buy without EPA card and HVAC license).
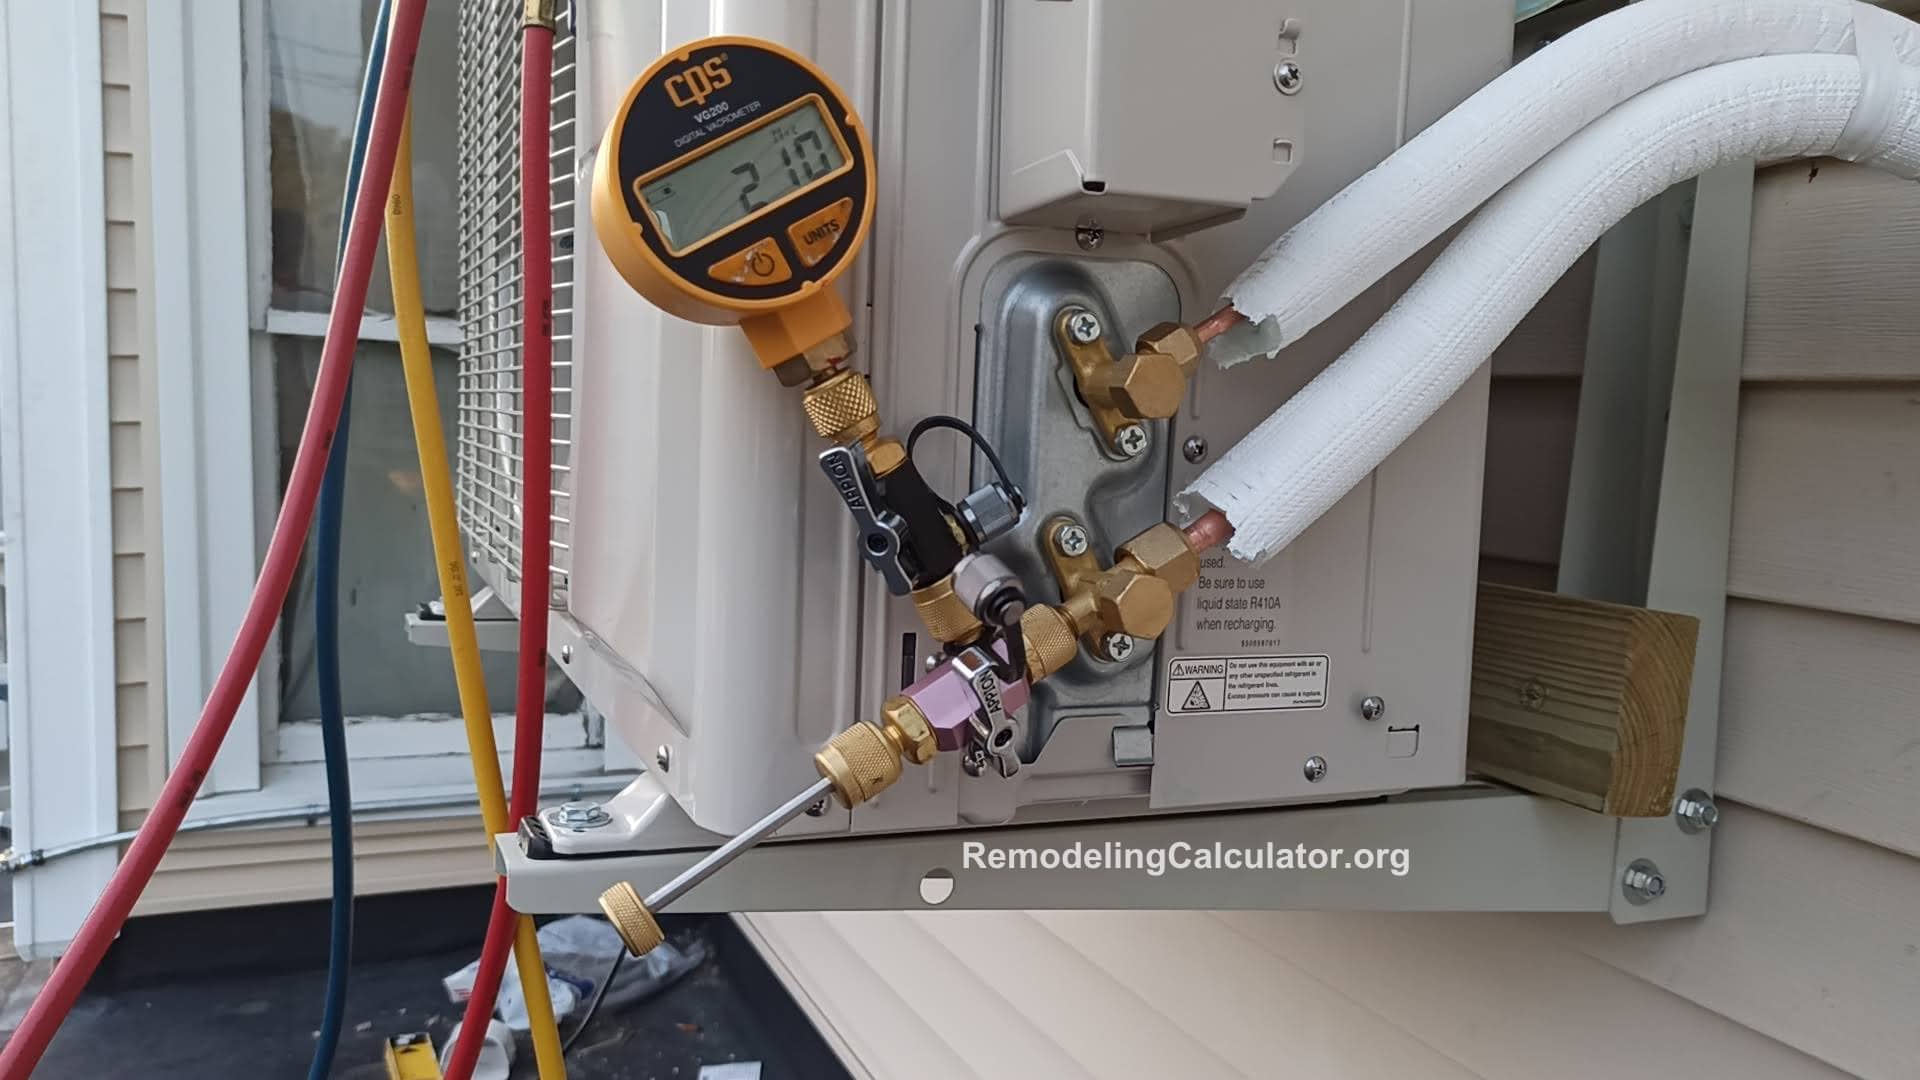
To install a ductless mini split all you need are tools (see below) to put copper line-set together, evacuate air, test for pressure and leaks, and oven valves on the outdoor compressor, to fill the system with refrigerant!
In this (very detailed) guide, I will walk you through “designing” your mini split system, choosing the right components, and the actual installation!
If you don’t feel like installing it yourself, you can get an HVAC contractor to do it.
 See costs in your area
Start Here - Enter Your Zip Code
See costs in your area
Start Here - Enter Your Zip Code
DIY Mini Split Install vs Central Air
Mini Splits are EXCELLENT at both heating and cooling – especially cooling. They are typically twice as efficient compared to window AC or Central AC!
Even though SEER ratings of Central AC systems are coming close to low-end ductless units, those are measured at the “air handler” unit. What no one tell you is that they lose 30-40% of efficiency inside your ducts!
So you get a lot less cool air from Central AC, compared to ductless systems, which in real life use up-to 50% less energy!
Are Mini Split Heat Pumps Good For Heating?
As far as heating, a properly put together hydronic (forced hot water radiator-based) GAS system will be more cost effective than a mini split heat pump. However, heat pumps are not far behind, and the versatility they offer often surpasses that of forced hot water.
If you have one room or area, which is not connected to your radiator, or a cabin in the woods, or if you have no GAS on your street, a high efficiency ductless heat pump is the best source of heating for many homeowners!
I am one of those homeowners, and I actually DID install my own Fujitsu 9RLS3HY (9000 BTU cooling + 21000 BTUs heating) super efficient mini split heat pump, primarily to heat my 600 sq. ft. split level loft addition.
And oh boy, does this mini-split heat! 2 days after I finished installing it, we had -10F temperature in Massachusetts, for 10 days straight! And this smallest capacity unit worked like a champ!
See for yourself:
In some cases people pay as much as $13,500+ USD or ($18,000 CAD) for a 4-zone Carrier system 🙁 … and it does not even heat well enough!
BTW, in cooling mode, this little Fujitsu, is a second most efficient Mini Split AC, rated at whooping 33 SEER, second only to a very weird and almost never installed “up-to 42 SEER” Carrier mini-split. I seriously doubt that Carrier is actually a true 42 SEER system, by looking at its specs. Also Carrier 42 SEER cost 40% that comparable 33 SEER Fujitsu (both 9000 BTUs).
Anyway, let’s get to the DIY installation…
DIY heat pump installation Part 1: Choosing the mini split system
There are two approaches to designing a multi-zone mini-split system, even before we consider the heat load of each zone.
The first approach is based on simplicity of installation and cost reduction. It basically calls for installing a single multi-zone compressor (outdoor unit) with multiple indoor units connected to it. This approach is 10-20% less expensive up-front, but will cost more to operate, and considerably more in repair costs, if the outdoor unit fails!
The second approach is based on modularity, and efficiency. Therefore, it ends up being more fail-proof. It calls for installing multiple single zone systems – one for each room. This is about 10-20% more expensive up-front, but will ultimately be much cheaper in the long run in both operating and repair costs!
PROS and CONS a multi-zone mini-split
Like in any mechanical/electric system – the more components you have in a single unit, the more things can go wrong! While combining several systems in a single unit is less expensive than buying each unit individually, you usually have to replace the whole complex unit when it breaks, vs replacing single less expensive units.
For the following examples we will take a total system rated capacity to be 36000 BTUs with 4 proposed rooms (zones). For pricing and efficiency comparisons, we will use a ductless mini-split system from Fujitsu (xltH High-Heat, highest efficiency models: 9RLS3HY vs AOU36RLXFZH). However, Mitsubishi, Daikin, Gree, Carrier, and all other brands will have a nearly identical pattern – the more BTUs or zones a system has, the lower is the efficiency!
Mini Split System Cost
Here is the cost of the main system components: indoor air handlers + outdoor compressor(s):
36K BTU 4-zone system: 1 AOU36RLXFZH Outdoor Unit + 4 ASU9RLF1 Wall Mounted Units only, is $5,649.
4x 9K BTU single-zone systems: 4 AOU9RLS3 Outdoor Unit + 4 ASU9RLS3Y Indoor Unit, is $1,746.95 each pair, or $6,987.80 for all.
A difference of $1,339.
PROS of a multi-zone ductless heat-pump system
Up-front cost of a 4-zone 36K BTU compressor will be about $1,000 – $1,500 less than than 4 individual outdoor units with average 9000 BTUs each.
You will need only a single 40-50 AMP 220/240V circuit (less wiring and electrical work).
Considering that each new 220/240V circuit will cost $400 to add, saving is $1,200 (you still need one of these, so you eliminate 3 circuits). If you have a “busy” main service or an outdated 100 AMP service, you will likely need an electric upgrade, but that goes for both 1 multi-zone or 4 single-zone systems.
That’s about it for the PROs.
CONS of a multi-zone ductless mini split heat-pump
The main disadvantage of a multi-zone mini-split is a huge drop in efficiency! Thus, a 4-zone 36K BTU Fujitsu AOU36RLXFZH has a maximum rating of 13 EER and 20 SEER (with 4 x 9K BTU non-ducted, wall mounted indoor units connected). All other configurations will result in lower efficiency!
This system will have a rated Cooling/Heating capacity of 35200/39400 BTUs respectively.
Now compare this to a single zone 9RLS3HY with 18 EER & 33 SEER rating, and 9000 Cooling BTUs with 22000 Heating BTUs! That is 28% lower EER and a whooping 40% lower SEER rating!
Although this is manufacturer/model specific, but Fujitsu 9RLS3HY has a built-in WiFi module, where as AOU36RLXFZH will need an extra WiFi module + adapter, costing about $200 per zone! And honestly, in 21st century WiFi/wireless connectivity to a smartphone is a MUST! Nobody will constantly run around the house to turn each zone ON/OFF!
Cost of repairing a multi-zone mini split
If a 4-zone outdoor unit breaks, it will cost you $3,729.00. At the same time, a single-zone compressor costs about $950 each. Chances that all 4 outdoor units will break are slim to none, whereas a single compressor breaking down in 5-7 years is fairly possible!
Basically, you will be paying about 30-40% more in operating costs to run a multi-zone system, and repairs are much more expensive, compared to 4 individual zones!
PROS of single-zone mini split heat-pump
The pros were pretty much covered in the sections above, but lets spell them out again:
1) Much higher efficiency of each individual system, resulting in average 30% lower operating cost. I use a Single Zone Fujitsu 9RLS3HY in my house in the Boston MA area, and my heating cost for 600 sq.ft. poorly insulated / drafty split-level loft is about $220 / month, for 6 month per year.
I have very expensive electricity at $0.24/kWh (thank you NEversource) … that is almost double the national average. If I was using a multi-zone setup, my monthly cost would be about $290 or $70 more per month.
In just last 2 heating seasons, I saved $840, and am now on my 3rd winter. After this spring, my estimated savings will be $1,260 … over 10 year life expectancy of this system, I will have saved about $4,200 in electricity, just on heating this space!
And this is just one zone! Although, really I would not be running all 4 zones at such high load. This is our main sleeping area, and it’s big and poorly insulated, and is very hard to install better insulation. Other bedrooms are much smaller, and operating costs per room should not be more than $100/room in the winter …
2) If something breaks, my material costs will be less than $1,000! And since I did the install myself, and have the tools, there is no labor cost.
3) As mentioned above, RLS3 family has built-in WiFi which is a LIFE SAVER!
CONS of single-zone ductless heat pump system
1. For each zone, you will need individual electric circuit and wiring that costs $400-500 to install. In my case, I also need to upgrade my main 150 AMP service to 200 AMPs, with an expansion sub-panel (about $1,800).
2. More outdoor units means more noise an vibration, as well as more “ugliness”. Although in mild temperatures, these units are VERY quiet, when we have extreme cold, I can definitely hear the outdoor unit going. However, it is less loud than our main furnace.
3. You need to find proper placement for each unit, and to provide adequate ventilation (the compressors do need space around them to “breathe”.
That pretty much covers pros and cons of each approach, and ultimately the choice is yours. More costs upfront, vs flexibility and massive operating and repair cost savings down the line – pick your poison.
Part 2: Sizing the mini split system – estimating vs. Manual-J calculation
Now that we have outlined the system types, let’s see what size mini split, indoor and outdoor units you will need. The simplest way to do this estimate is to get 2-3 HVAC contractors out to your house for an estimate. These guys will give you the price and system size.
In my example, a local Mitsubishi contractor proposed 18K BTU dual zone system (for $7,500) for my 600 s.f. 2-level loft. However, the estimator spent about 5 minutes looking around, did not measure anything, and based his numbers on my area estimates. Keep in mind that my split level addition has cathedral ceilings, with max ceiling height of 20 feet off the first level floor, and about 12 feet from the 2nd level floor. It also has about 50% more air volume vs a one-level 8′ ceiling height room.
I did my own “quasi” Manual-J, considering all the heat loss from drafty walls, vented crawl space under floors, and super-cold attached garage, and came to a conclusion that I need about 10,000 BTUs of heating! So I opted for my 9000 BTU (cooling) + 22000 BTU heating Fuji 9RLS3HY, which would work in temps of -15F and even lower!
And guess what – it works just fine and provides PLENTY of heating! However, in the summer, the cool air does not reach the 2nd floor (physics) … but in the winter, for which this heat pump was primarily installed, I have more than enough heat, which usually runs in Auto mode!
Why such a long story? Most contractors DO NOT want to spend 1-3 hours doing Manual-J Heat Loss/Load calculation on each house where they do an estimate! That would be stupid, as 50-75% of homeowners never hire them!
Also contractors do not want to under-size the system, because if there is not enough Cooling (or Heating), the client WILL complain, and may even sue the contractor! So they OVERSIZE every single job, to cover any “screw-ups” in the calculation!
Thus, since I really only needed 9000 BTUs, I would be paying about $3,500 MORE for the extra BTUs and an extra zone, which I did not need, had I listened to the HVAC pro. So I would get a far less-efficient system, and spend much more on operating costs down the line.
What this means for you?
Based on my experience, keep in mind that most contractors and online mini split calculators use a very stupid and inefficient formula of 9000 BTUs for every 300 sq. ft. of space, without ANY consideration for insulation, heat loss, etc. From what I can see, even a poorly insulated area, does not need more than 7000 BTUs high efficiency system for every 300 sq. ft.
Unfortunately, Fujitsu does not have any single-zone systems smaller than 9K BTUs. However in multi-zone configurations, you can mix 7K, 9K 12K, 15K and even 18K BTU indoor air handlers (depending on outdoor unit that you get, with up-to 130% “connected capacity”), depending on the size of your rooms. For example if you have a 200 sq. ft. bedroom, you definitely should not put more than 7K BTUs in it. 9-12K will be too much capacity and will LOWER your efficiency!
In any case, my recommendation is to use a formula of 9000 Cooling BTUs for every 350-400 sq.ft. and you “should be” safe. I also strongly recommend you do your own ADDITIONAL research and use this excellent Manual J online calculator!
Part 3: How to choose the best ductless mini split unit
Here is how I look at it:
Tier 1 mini splits
Fujitsu / Mitsubishi ductless mini split – both are Japanese manufacturers, which are very reliable and efficient. However, Mitsubishi is more expensive than Fujitsu by 10-15%!
Daikin (Japan) is also tier 1, but about 20% less efficient, yet pretty expensive!
LG (Korea) is pretty competitive on pricing, very good quality, but slightly lower efficiency than Fujitsu / Mitsubishi.
Tier 2 mini splits
GREE (China) is one of the largest Heap Pump manufacturers in the world, and is also sold as a private label using other brands. Very good prices, but not as efficient as tier 1 brands. Moreover, generally with a lower price, you get slightly lower quality, with a higher chance of things breaking down.
Carrier and other US brands. Unfortunately, US brands are not as efficient and not as good as Japanese / Korean tier 1 counterparts, yet they are pretty expensive, while quality could be better. Hence we put these in Tier 2, together with GREE.
Tier 2.5 mini splits
MR COOL heat pumps – I would put the heavily promoted MrCOOL brand somewhere between Tier 2 and 3. I think they are made by GREE, which would squarely put MR COOL in Tier 2, but MrCOOL does not disclose who makes their units, so it could be any other manufacturer in China making them. Therefore, I invented “tier 2.5”.
Tier 3 mini splits
These are basically “no-name” brands, often sold under private label, and made in numerous factories across China. These tier 3 units are VERY inexpensive! You can buy a 12000 BTU unit with line set and electric cable for $750!
The efficiency and reliability of Tier 3 brands is not on par with Tier 1 & 2 brands. However, if you have an area in your home where you need to use the ductless system sometimes (not mission-critical), such as wood shop, garage, patio, guest bedroom, etc, Tier 3 brands are just fine. I mean they usually will work out of the box, and will last a few years. Just don’t expect them to be as good or as efficient as Mitsubishi/Fujitsu!
Part 4: Determine what is the purpose of your mini split
As discussed above, if you have multiple rooms (zones) where you need to install your heat pumps, my recommendation is to use Single-Zone unit for every room. However most HVAC installers will suggest going with a multi-zone setup. The choice is yours, but I recommend that you review the Pros & Cons of each again.
Now, what you need to make perfectly clear for yourself is – what is the main/primary purpose of your Ductless setup? Is it Cooling or Heating or Both?
NEED HELP? If you can’t decide or don’t know exactly what you need – ASK ME in the comments section below. Just explain your needs and I will provide my recommendations!
Best mini split heat pump for cold weather
If you live in colder states and DO need heating, I definitely recommend High Heat (-15F heating) models from Fujitsu, Mitsubishi or LG (they are the only 3 brands that make Hyper Heat, low temp systems).
For heating, you will also need a base-pan heater installed in the Compressor (outdoor unit). Fujitsu and LG have base-pan heaters pre-installed, while Mitsubishi makes you buy and install one separately, even on the Hyper Heat models (really Mitsubishi???)!
Keep in mind that most non High Heat models will still work in the range of -5F to +5F and above. They just won’t be efficient and will lose heating capacity as they come near their low temp limits.
Best mini split AC for COOLING
If you live in warmer southern states, you definitely do not need High Heat. Moreover, if your electricity is inexpensive (below $0.15 / kWh), such as in FL, TX, and most other southern states, you can go with “middle of the road” efficiency rating of about 20-25 SEER for a single zone system. If you live in California, where electric costs can go as high as $0.30/kWh and where you have peak-pricing during the day, go for a top of the line high efficiency model, without High Heat.
Mini split for both HEATING & COOLING
If you live somewhere in the middle pf the US or if you live in the northern states, and need both heating and cooling then I recommend getting a highest efficiency model from any of the Tiers above. Even Tier 3 brands have high efficiency models, which go as high as 25 SEER on the cooling side, and can produce heat in temps as low as -5F.
So basically, see where you live, and whether you will be using your mini split as a primary source of heating and/or cooling in your home or as a secondary unit, and decide on the brand and efficiency that best works for you. I recommend going for high end models – they will pay off very quickly!
Part 5: DIY ductless heat pump installation
Ok, we got to this part finally! Installation section will be massive, as there are many nuances to know. I will demo each step in a video as it’s easier to show than to explain, and give a brief description here.
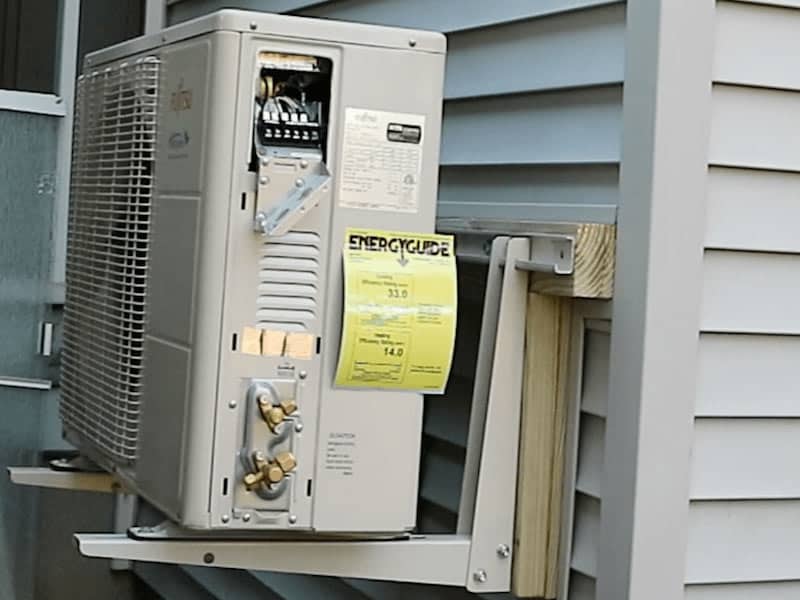
You can begin installing either an Indoor unit or an Outdoor Unit first. I will start with the outdoor condenser. Since I live in MA, where we get a lot of snow, I decided to put my compressor on a wall mount, 3 feet off the ground to make sure it’s not covered in snow and can produce heat.
To install the wall mount/bracket. If you don’t get much snow, or won’t be using your mini-split for heating, you can put it on a pedestal.
I am also planning to replace my siding in the future, and add 1.5″ of insulation on the outside. To make this possible without removing my condenser later, I added double 2×4 pressure treated wood brackets behind the wall mount.
Mini Split Installation 1: Installing the wall mount
It is a good practice to do it this way regardless of whether you will go through the craziness of replacing siding and adding wall insulation on the outside or not. You still want to remove a section of siding to find the studs (I use ProFinder 6000) in your wall and attach your mounting bracket to the STUDS!
Installation video #1 – removing siding and finding studs
The next step is to install a wall mount. As mentioned above, I plan to replace my siding, and add wall insulation behind it. So I’m adding double 2×4 wood to create space between wall and mounting bracket for the condenser. This way, when I replace the siding, I will not have to remove my condenser off the wall.
For this part, I used 6″ and 7″ heavy duty screws, to attach my 2×4 boards to studs/walls, and screwed them in using Hitachi Impact Driver. However, as you can see in the video below, it was barely power enough.
I recommend a Ryobi 1/2″ Impact Driver with 300 foot pound torque, which I now do have and use. The Ryobi has a lot more power to drive those long lugs in!
Installation video #2 – installing the wall mount bracket
Installation video #3 – putting siding back around wall mount
Installation video #4 – mounting condenser (outdoor unit)

Thank you, thank you!!
What happened to the rest of the installation process description? Connecting and purging the lines…
where is the rest of installation videos?
inside?
And line hookups ,electrical , vacume line set. pressure test, gas release? etc?
Will a ductless Mini Split efficiently remove the moisture found in Southwest Florida
Hi Robert,
Yes, mini-split will remove moisture in Southwest Florida, as well as in any other state.
12000 BTU (1 ton) unit will remove an average of 1.5-2 liters / hour.
18000 BTU (1.5 ton) system will remove about 2.8 L/hr.
And so on. These systems work very well as dehumidifiers!